Choosing and Sizing Batteries, Charge Controllers and Inverters for Your Off-Grid Solar Energy System
If you are designing a solar electricity system and don't have access to the grid, you are going to have to deal with solar batteries. After having decided which type of battery to use, it will be time to size your system. During this step you are going to encounter a little math. Fortunately, SolarTown is here to guide you through the calculations. In general the system should be big enough to supply all your energy needs for a few cloudy days but still small enough to be charged by your solar panels. Here are the steps to sizing your system.
Related Articles:
Solar battery Storage Systems: If You Can't Tell Your AGM from Your Gel
Off-Grid Solar Energy Systems: Lifeline to Civilization
Battery bank capacity - calculating your amp hour needs

Inverter size
To determine the inverter size we must find the peak load or maximum wattage of your home. This is found by adding up the wattage of the appliances and devices that could be run at the same time. Include everything from microwaves and lights to computers and clocks. The sum will tell you which inverter size you need. Don't forget that some appliances take more than their rated power at start-up. The inverter's surge rating should cover these temporary increases.
- Example: A room has two 60 watt light bulbs and a 300 watt desktop computer. The inverter size is 60 x 2 + 300 = 420 watts
Daily energy use
Next find the energy the home uses in a day. Figure out how long each electronic device will be run in hours per day. Multiply the wattage of each device by its run-time to get the energy in watt-hours per day. Add up all the watt-hour values to get a total for your home. This estimate is likely too low as there will be efficiency loses. To get a rough idea of the real value with system loses, multiply by 1.5. This will help account for decreasing performance when temperature increases.
- Example: Light bulbs run for 5 hours a day. Computer runs for 2 hours a day. 120 x 5 + 300 x 2 = 1200 watt-hours. 1200 x 1.5 = 1800 watt-hours
- Note: refrigerators and freezers do not run 24/7, assume 8-12 hours per day of run time.
Days of autonomy
Now decide how many days worth of energy you want to store in your battery bank. Generally this is anywhere from two to five.
Battery bank capacity
Finally we can calculate the minimum battery AH capacity. Take the watt-hours per day and multiply them by the number you decided upon in step 3. This should represent a 50% depth of discharge on your batteries. Therefore multiply by 2 and convert the kwh result into amp hours (AH). This is done by dividing by the battery voltage.
- Example: You want the battery bank to last three days without recharging and you use 1.8 kwh per day. As 1.8 x 3 x 2 = 10.8kwh, this is the capacity we need from the batteries. Converting this to AH we have to divide by the voltage of your system. This can be 12, 24 or 48 for commercial application. If we choose to use 48V, the minimum AH capacity is then 10 800/48 = 225 AH. Now if you divide by your battery's rating you find the number of batteries you must use. Careful, this only applies to certain wiring setups (i.e. 12-volt battery systems).
NOTE: The above applies to traditional lead-acid batteries, not lithium, which can have close to 100% depth of discharge. Leave out the "multiply by two" step in the process above if you are using lithium batteries.
Related article: The Good, Bad and Ugly in Solar Inverters
Charge controllers - don't overcharge your batteries!
Charge controller sizing is the next step when sizing your system. As you have probably not yet encountered these components we will briefly discuss them. If you wish to get straight to sizing your charge controller, skip to Calculation.
Overview
Charge controllers regulate the power coming from the solar panels to the batteries. They are a key part of any off-grid system and prevent batteries from over-charging. We will discuss two kinds of charge controllers: PWM and MPPT.
PWM (Pulse-Width Modulation) controllers are cheaper than MPPT but create large power loses. Up to 60% of power can be lost. This is because PWM controllers do not optimize the voltage going to the batteries. This limitation makes a PWM controller a poor choice for a large system. However, in smaller systems their low price makes them a viable option.
MPPT (Maximum Power Point Tracking) controllers optimize the voltage coming from the solar panels so that the maximum amount of energy is transferred to the battery bank. The maximum power point, or the optimal conversion voltage, will fluctuate with changes in light intensity, temperature and other factors. The digital optimization process performed by the MPPT controller find and adjusts to the maximum power point quickly. Sophisticated electronics are needed in MPPT controllers to do this, which explains their higher price. There is a significant pay-off though: MPPT controllers are 93-97% efficient in converting power.
Calculation
Once you have sized your battery bank and solar panel array, determining which charge controller to use is comparatively straight forward. All we have to do is find the current through the controller by using power = voltage x current. Take the power produced by the solar panels and divide by the voltage of the batteries. For example:
- Example: A solar array is producing 1 kw and charging a battery bank of 24V. The controller size is then 1000/24 = 41.67 amps. Introduce a safety factor by multiplying the value you have found by 1.25 to account for variable power outputs: 41.67 x 1.25 = 52.09 amps
In our example we would need at least a 52 amp controller. The Flex Max MPPT Charge Controller-FlexMax 60 would fit our specifications.
Battery wiring - putting it all together
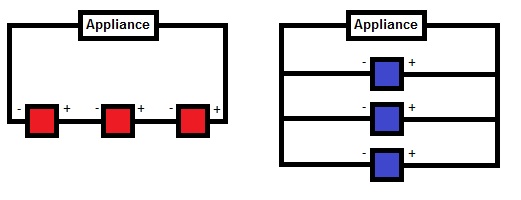
Wiring is going to play a major role in determining the number of batteries you need. The goal, in this final step, is to produce target AH and voltage. There are two methods of wiring components in a circuit: parallel and series. In the following diagrams blue batteries are in parallel, red batteries are in series. In a series configuration the battery voltages add up while in parallel, current adds up.

Series and parallel connections can be combined to produce the voltage and AH that you require. Just remember:
Series → voltage adds, current does not
Parallel → current adds, voltage does not
We would like to mention that parallel connections are to be minimized as they can decrease battery life. If a used battery is connected in parallel to a new one, it will degrade the fresher battery and the lifespan of the whole system will decrease. This characteristic has made some conclude that an ideal battery bank would consist of a long line of batteries connected in series. Unfortunately this is not always possible due to voltage and AH requirements of a system. We recommend a maximum of three batteries or strings in parallel (again this only applies to lead-acid batteries, not lithium).
As we mentioned earlier it is not always easy to find out how many batteries you need to power your home. This is because wiring configurations have a huge impact on the output of a battery bank. So always design your storage system before you buy any components! If you would like more details on battery wiring, please refer to this website.
