Guide to Solar Commercial Lighting
Solar panel prices have dropped substantially. New advances in technology have migrated from the laboratory to the field. We are now seeing the combination of these factors allowing us to use solar energy in unconventional places and in applications we would never have dreamed of just a few short years ago. One relatively new application of solar energy that has now gone mainstream is commercial solar lights.
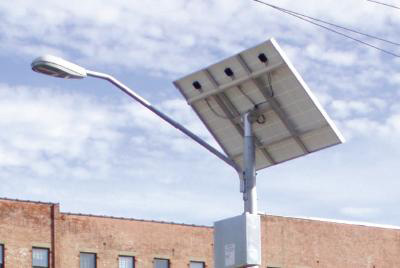
I'm sure you see the recent trend popping up on Main Street in cities and towns around the country where the old dilapidated street lights are now being replaced with solar street lights. You probably wonder why municipalities are doing so. The answer is simple: solar commercial lighting not only saves money, but also is an eco-friendly product doing its part in reducing overall energy consumption.
In this article we are going to tell you how to select commercial solar lighting for a whole host of applications. Before we begin the selection process, let's make sure you have a few things handy like a pencil and a sheet of paper. Yes, pencil and paper an still be useful these days.
Step 1: Figure out how much sunlight the area receives
First, you'll need to know where in the country you will be installing the commercial solar light. This step is important in determining the optimal hardware and equipment to be used. The National Research Energy Laboratory (NREL) provides a detailed state-by-state map of direct sunlight hours. Locate your state on the map and record the number of direct sunlight hours you can expect to receive. Next, determine the effect of site obstructions. Trees, buildings, clotheslines, or anything else that blocks the sun's rays are not friends of a solar energy system.
If the location is free of obstruction, then we can use the amount of direct sunlight from NREL to choose a solar light system. Otherwise, you will need to remove the obstructions or position the commercial solar light where obstructions will be minimized. Be sure to record the amount of sunlight and the effect of obstructions so that you can reference this information later on.
Step 2: Determine the size of the area you want the solar lighting system to illuminate.
Before we continue with this, a few things must be noted. I will not get into the fun technical details because I'm sure it will bore the heck out of you, so I will provide only general pointers. If you wish to delve further into the technical considerations, you can read about them on this page at Rensselaer University. Now, most commercial solar lights will use LED technology because it consumes less power for similar lighting coverage. The rationale is that if the light consumes less power, then your total costs will be lower as well.
A) For commercial lighting applications it is very important to know the area you want to illuminate. For the sake of simplicity, we will be using square feet in our discussion. We want to measure the length and width of the area and then calculate the square footage. Take out your trusty tape measure or fancy laser pointer and measure the length and width. Write down the measurements
B) Whether you use incandescent, fluorescent or LED lights, their ability to illuminate an area will vary with conditions. Some of the conditions that will affect lighting are reflection, the obstructions we noted earlier, efficiency, heat, and insects. For our purposes, we will assume no obstructions-but make sure you keep them in mind. Bugs love light so the light should have some form of protective housing so dead bugs do not accumulate causing light reflection.
C) The coverage area in which an incandescent, fluorescent or LED light will have diminishing light intensity as you step further away from the focus point. What I mean by this is for example, if you stand directly under a light reading a book it's probably too bright to read the book. If you walk further away, you can begin reading the book but once you travel far enough away you can no longer read it because lighting is now poor. This is the idea of the focus point or area. That point or area is super bright but will have diminishing brightness as you travel away from it.
Step 3: Determine the surrounding conditions.
This part is very important for any commercial solar lighting application: Safety, safety and more safety. The commercial light will run during night time so a super bright light may not be the most practical solution because the last thing you want to do is blind someone driving a car down the street (be totally not cool). It may also bother some residents living near the light - thus opening the door to a lot of complaints. All lights will vary in strength so keep in mind the coverage area and how strong that light is at its focus point. It is more ideal to have a commercial light cover a larger area with a more uniform intensity throughout the area. Information on different commercial lights can be found in the SolarTown store for commercial solar lighting.
Step 4: Focus on the coverage area.
With different lighting design technology, the actual coverage area will vary. What I mean by this is that for example, the lumen rating for a spot light might be extremely high but its ability to cover a large area is limited because a spot light is designed to illuminate a small area with an intense beam of light. How it achieves the high strength and high lumen for the small area is through its design and technology. So when evaluating lights, be careful not to strictly focus on lumen rating but focus more on the coverage area because a light with a high rated lumen value might not cover a large enough area required for your project. The manufacturer of the commercial solar light will provide the approximate coverage area and technical data to determine if the hardware is suitable for your circumstance.
Step 5: Research lighting foot grids for lights you are considering. 
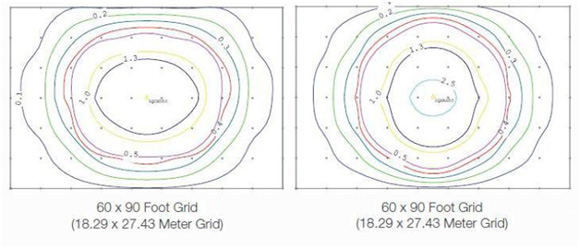
Let us review a lighting foot grid. Here is an image provide by SolarTown to illustrate the coverage of a conventional commercial light.
All commercial solar lights will have a foot grid similar to this image. If you look at the inner-most circle (almost a circle) the light intensity is the highest because it is the direct focus point. As you move away, the intensity decreases which makes sense from what we discussed. Just to point out something, this coverage grid is 60 X 90 foot - so this light covers a large area.
Step 6: Select the hardware for the solar lighting system.
Since you know the coverage area of your commercial solar light application and the amount of direct sunlight your area receives, it is time to pick out the right hardware to get you up and running. There are many available commercial solar lightsto choose from depending upon additional bells and whistle you want to equip on the solar light. For example, commercial solar lights will have pre-determined backup reserve for additional run time. This allows the commercial solar light to run even on raining or cloudy days. Depending on how many additional days you want on reserve (most will have 2 - 5 days of additional reserve), you can pick the system that is right for your application.
Step 7: Contact us at SolarTown to discuss the options.
Now you have all of the information you need to make an informed decision about your commercial solar light options. Contact us at SolarTown for any questions you may have on coverage area and actual intensity to determine the most suitable product for your project. Like anything we do that involves heavy equipment or electricity, keep safety, safety, and more safety in mind!
